If you want to learn the C programming language completely. So first you have to manually install C programming software in Windows, Linux, Mac, or Android operating system installed on your desktop, laptop, or computer or inbuilt programming compiler or interpreter built-in source code to successfully execute the C program Will have to do Here if you want to run all programs created in C programming without error, Programming error here refers to syntax error, logical error, or man-made manual and absent-minded error of the removal. So let us now manually install C programming software on our Windows computer. The Dialog of Steps given below gives you the complete graphical details of the installation of Dev C++ software in the Windows operating system.
Installation of C programming software in various operating systems.
• Install C language in Windows 7 and later operating system.
• Install C language in Unix operating system.
• Install C language in Linux operating system.
• Install C language in Mac OS.
Install C language in Windows operating system.
• Buy Turbo C, Dev C, Eclipse C, Netbeans C, GCC compiler, software from a C programming software company or download a free trial and free versions, or download open source C programming applications from the Internet.
• Run the downloaded C program software setup program file in Windows, and install all the required files and folders properly on your computer.
• Run the C program software from the cmd command prompt or start the graphical menu program application from Windows. Create a new project file and type c source code manually error-free code.
• Compile the C source code into the existing software, input the code, execute the required program output, and wait until the software or C compiler outputs.
Dev c++ – Dev C++ Free Download C is C++ program compile software. Anyone can directly download it from its official website. After download, you can install it graphically in your Windows operating system. Here you can manually configure the Dev C++ software environment as per the C programming requirement. And finally, in the code editor window, you can type C source code. and can run the program for testing, or manually edit the program source code until the final output is obtained.
Note – Here you can download Dev C++ software for Windows, Linux, and Mac from the given weblink – http://www.bloodshed.net
Install dev c in windows 7.
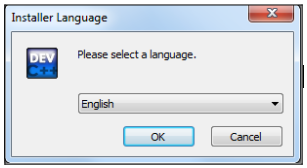
Step first – Double click on the downloaded Dev C++ software setup file icon on your computer. Start Dev C++ software manual installation. Here you select the default Dev C++ language English on your computer and click on the OK button to continue.
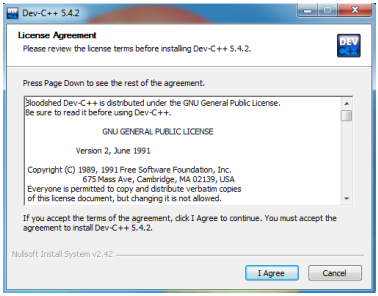
Step second – In the 2nd step read and understand Dev c++ software user license agreement carefully and click on the I agree button to continue with the setup step manually. Here every computer user abides by the terms and conditions in the Software License Agreement while using the Dev C++ Software.
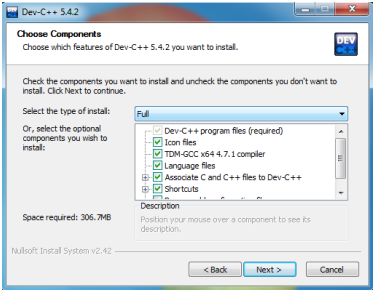
Step third – Choose Component Install with dev c++ software default installation. Here you don’t need any control with the default dev c++ installation setup. If yes then you click on the checkbox on or off button, if it is not required, click on uncheck checkbox button, and click on the Next button to continue programming dialog setup.
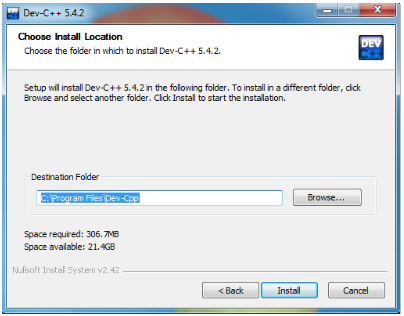
Step four – In step four you define the default storage directory of Dev C++ in your computer hard drive location. Here you can set it to the default location set by C:\Program Files\dev-cpp in your computer or change this location to the new location, if it is not required, you can leave it at the default.
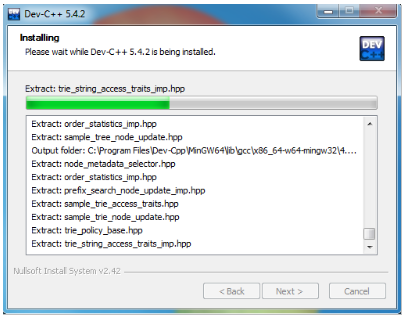
Step five – Here now you wait till install the dev c++ software. until all dev c++ files are completely copied to the c:\program files\dev-cpp location. until all software files are properly setup. Manually click on the Next button to get the next software setup dialog and continue with software installation.
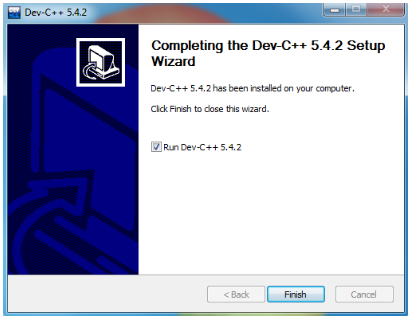
Step six – Click on Dev C++ Software Dialog Wizard Six Finish Dev C++ Installation/Setup Process Dev C++ Startup Window Display. Now write the desired C source code in the new project file.
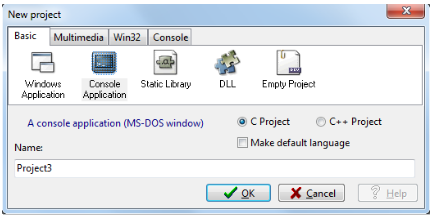
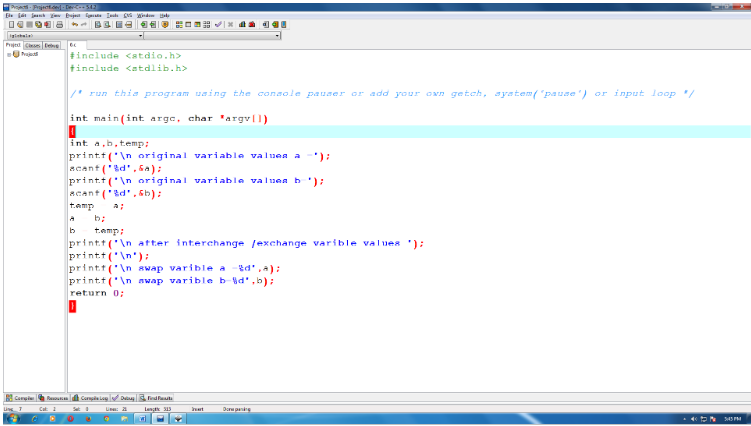
Create new project – Open the Dev C++ software. Click on the New option in the File menu. Select New Project File New Project Window Display same will appear below, Click on Console Application (MS-DOS Window). Select the C Project radio button and type the project name Click the OK button to continue with the project and write the C program source code.
Startup windows of dev C software.
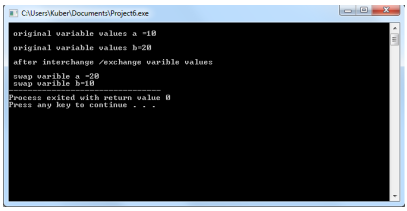
Output windows above program – Output window display in MS-DOS window. This window takes the input arguments from the programmer and generates the result/output as per the logic satisfied. Finally, a window similar to the one below is displayed.
How to Compile or Run Dev C Programs.
• First click on the Execution menu.
• Select on Compile or press the F9 key (you must now wait until the program is fully compiled)
• Now after compilation, click on Execute menu. Select the Run option again or manually press the F10 button from the keyboard.
• Now enter manual input as per the program you created.
• In Dev C++ software the output will be produced as per your given logic program.
• If there is no error in the program you created in Dev C++ software. So you will get 100% accurate program output.
How to Manually Install Dev C++ Software in Ubuntu Linux.
• The First you click on Terminal, Root Terminal, or Console Window in dash home menu.
• You must login as the root user or superuser in the terminal window.
• Now in the terminal window, type sudo add-apt-repository ppa:ubuntu-toolchain -r /test, in front of you type command.
• Get sudo apt-get updates for existing Ubuntu Linux operating systems.
• Now type sudo apt-get install gcc-4.8, as an administrator user in Terminal Root Windows.
• sudo update-alternatives –install /usr/bin/gcc gcc /usr/bin/gcc-4.8 50, type the command.
Related posts
 Everything About Microsoft Windows 10.
 Microsoft Windows Legacy Operating system.
 About Microsoft office 2016
 About Microsoft Office 2013 Pro Plus.
 About Microsoft Windows 7.
 About Microsoft Windows 8.
 Linux, What is Linux, A Complete Overview of Ubuntu Linux.
 Microsoft Windows 10 Operating System Apps.
 About Libre office.
 Pc assembly and its operation.
 Start With C Programming In Hindi.
 Computer Fundamental.
 About Microsoft Windows 11 Operating system.
 Microsoft Windows 8 Apps.
 Learn C Programming
 About Arduino Microcontroller Board
 Learn Java Programming
 About C# Programming
 Apache Open Office.
 About Kotlin Programming
 C language Algorithms, Flowchart, and Terms.
 About ReactJs Framework
 Type of Computer Programming.
 About Delphi Programming
 First Program In C Language.
 About Objective C Programming
 What Is Tailwind Css
 About Scala Programming
 About Typescript Language
 About Dart Programming
 About Raspberry pi board
 What Is C Programming.
 Computer Motherboard and its Components.
 About Microsoft Office 2013 Pro Plus Hindi.
 About mysql
 About Assembly Programming
 What is Nodejs
 About Pl/Sql
 About Vue.js
 About Microsoft office 2016 Hindi
 Microsoft Windows Legacy Operating System Hindi.
 Everything About Microsoft Windows 10 Hindi.
 Learn Java Script Programming
 About MongoDb Database
 Mouse and Keyboard Operations.
 About Python Programming.
 About Machine Language
 About Python Tableau
 About Perl Programming
 About Visual Basic.net
 First Program In C Language In Hindi.
 Computer Motherboard Slot and All Types of External Cards.
 About Go Programming Language
 Polynomials Class 10th
 Computer Motherboard Ports And Cable Type.
बहुपद कक्षा 10 (Polynomial Class 10th)
Computer Motherboard Ports And Cable Type.
बहुपद कक्षा 10 (Polynomial Class 10th)
 About Ruby Programming
 About R Programming Language
 About Postgresql
 About Microsoft office 365.
 Learn Html5
 Learn Html
 What Is Bootstrap Css
 What Is Express.js
 About Scipy Python Library
 What Is The Internet?
 What Is Bulma Css
 About Wps Office.
 Internet Network Services And Ftp Protocol.
 About Libre office In Hindi.
 Python Q&A Sections.
 About Json json javascript object notation
 Type of Computer or Internet Network.
 Input And Output Device.
 About Magento Programming
 About Microsoft Windows 7 Hindi.
 About Sql – Structure Query Language
 Trigonometry Class 10th
 त्रिकोणमिति कक्षा 10 (The Trigonometry Class 10th)
 About Computer Memory.
 Data Type In C Programming.
 Type of Variable In C Programming.
 About Xml
 What Is A Search Engine and Their Type?
 About Asp.net
 Pc assembly and its operation Hindi.
 About Matlab Programming
 About Python Numpy
 Microsoft Windows Q&A Sections.
 Quadratic Equation Class 10th
 About Pandas
 Type of Computer Programming in Hindi.
 Coordinate Geometry (Analytical Geometry) Class 10th
निर्देशांक ज्यामिति कक्षा 10 (The Coordinate Geometry Class 10th)
Coordinate Geometry (Analytical Geometry) Class 10th
निर्देशांक ज्यामिति कक्षा 10 (The Coordinate Geometry Class 10th)
 Data Type In C Programming Hindi.
 What Is Jquery/javascript query
 About Microsoft windows 11 Hindi.
 What is Linux, A Complete Overview of Ubuntu Linux Hindi.
 Types of Network Communication Media And Network Topology.
 Internet Technology And Network Protocols.
 समान्तर श्रेढ़ी कक्षा 10 (Arithmetic Progressions Class 10th)
 Arithmetic Progression Class 10th
 Microsoft Windows 10 Apps Hindi.
 What is Angular Js
 Microsoft Sql Server
 About Microsoft Windows 8.1 Hindi.
 About Joomla Cms
 About Python Programming In Hindi.
द्विघात समीकरण कक्षा 10 (Quadratic Equations Class 10th)
About Python Programming In Hindi.
द्विघात समीकरण कक्षा 10 (Quadratic Equations Class 10th)
 Most Used Popular Internet Messenger And Social Media Platform.
 Variance in Statistics: Definition, Formulas, Properties, and Examples
 Triangle and its Properties Class 10th
 त्रिभुज और इसके गुण कक्षा 10 (The Triangle and its Properties Class 10th)
 Heron’s Formula Class 9th
हीरोन का सूत्र कक्षा 9 (Heron’s Formula Class 9th)
Heron’s Formula Class 9th
हीरोन का सूत्र कक्षा 9 (Heron’s Formula Class 9th)
 Geometrical (Graphical) Meaning of the Zeroes of a Polynomial Class 10th
 बहुपद के शून्यकों का ज्यामितीय (आलेखीय) अर्थ कक्षा 10 [Geometrical (Graphical) Meaning of the Zeroes of the Polynomial Class 10th]
 About Swift Programming
 Microsoft Windows 8 Apps Hindi.
 HTML Elements
 Representation of Real Numbers on the Number Line Class 9th
 An In-Depth Review of imagestotext.io in 2023
 Sets Class 11th
 समुच्चय कक्षा 11 (The Sets Class 11th)
 Perimeter and Area Class 6th
 HTML Elements In Hindi
परिमाप और क्षेत्रफल कक्षा 6 (Perimeter and Area for Class 6th)
HTML Elements In Hindi
परिमाप और क्षेत्रफल कक्षा 6 (Perimeter and Area for Class 6th)
 HTML Document Structure
 Sum of First n Terms of an Arithmetic Progression Class 10th
 समान्तर श्रेढ़ी के पहले n पदों का योग कक्षा 10 (Sum of n Terms of Arithmetic Progression Class 10th)
 Operations on Real Numbers Class 9th
 वास्तविक संख्याओं पर संक्रियाएँ कक्षा 9वीं (Operations on Real Numbers Class 9th)
 Operators In C Language.
 Internet Network Services And Ftp In Hindi.
 Apache Open Office Hindi.
 HTML Document Structure In Hindi
 Euclid’s Division Lemma Class 10th
 About Microprocessors Cpu.
 Coordinate Geometry Class 9th
 निर्देशांक ज्यामिति कक्षा 9 (The Coordinate Geometry Class 9th)
 Introduction to Euclid’s Geometry Class 9th
 यूक्लिड की ज्यामिति का परिचय कक्षा 9 (Introduction to Euclid’s Geometry Class 9th)
 What Is A Search Engine and Their Type In Hindi?
 nth Term (General Term) of an Arithmetic Progression Class 10th
 Section Formula Class 10th
 समान्तर श्रेढ़ी का n वाँ पद (व्यापक पद) कक्षा 10 (nth Term of Arithmetic Progression Class 10th)
 विभाजन सूत्र कक्षा 10 (The Section Formula Class 10th)
 Decimal Numbers Class 7th
 दशमलव संख्याएँ कक्षा 7 (Decimal Number Class 7th)